- How the images are created -
(The used image, to create this making of, is for version 0.5)
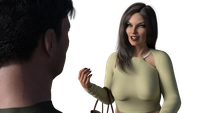
The first step, to create an interaction image, is to dress up and
pose the characters needed for the scene.
Based on cinematic rules, I try my best, to support the story within
every shot and try to give every images some space to 'breathe' and
to understand the situation, even if there is no text/talking at all.
The hardest point at this moment is, to imagine the scenery around.
The characters are rendered on standard alpha transparency background,
to integrate them later into the world itself easier.
From the beginning, my intention was to create a feeling for the player,
to be "inside a situation" without using a "first person perspective"
This kind of perspective, give me the freedom, to play with the distancing
of the camera in relation to MC, without breaking the "main perspective"
to much and confusing players while playing.

After setting up lights (based on the scene/environment) and adjusting
everything I start the rendering process, to get the first "raw image".
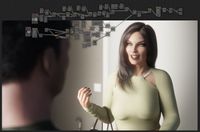
The next step is to take the screenshot of the raw DAZ preview and bring it into 'fSpy'
This is kind of a 'tracking software' to match the camera attributes,
like position/orientation/FOV etc, to integrate the 2D image into a 3d scene.
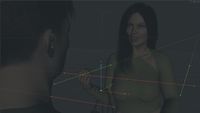
After solving the raw preview image, I import the file as a new camera into Blender.
I just have to move around the camera to the point where I need it,
without touching the rotation of the camera anymore, because the rotation
and FOV is already matched, for the current image.
(I zoomed out a bit here, to get a better understanding for the the environment)
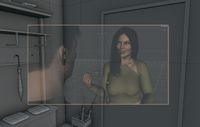
Now the fun part starts!
But first, let's see how the image would look like if this would be final.
If I render the scene now inside Blender, I'll get just the blank background
of the entry area without any characters, because the camera is just
showing a preview, which has no further influence for any renderings at all.
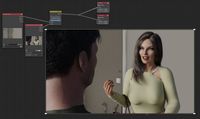
I'll import the original raw image, I recently rendered in DAZ
and put both together in Blender's compositer.
Some of you may noticed already the kind of "edgy" MC backside.
I did this on purpose, because he will be DOF-blurred out anyway.
Usually you'll cut off ressources or lower quality if possible
to save up rendertime.
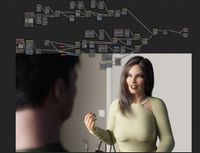
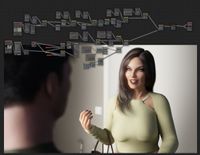
Next, I'll prepare my compositing to continue.
I need the characters seperated, to work on MC, without
touching Larissa and the same in reverse of course.
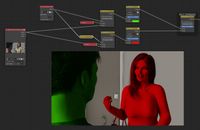
I quickly create a mask and split one image into two half images (kind of)
With the mask I create now two different strings, one for MC and one for Larissa.
I cut it with the created mask, do the same with the second string but invert it.
After that, I can recombine both, to have them both back on screen,
for the rendered image later.
(I highlighted this in green/red for better understanding)
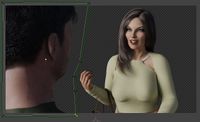
The next step is to think about the Situation again based on photography rules.
Larissa is the main object in this shot of course, so she'll be as sharp as needed
Normally the background would be blurred (based on DOF), but in this
special case, the background couldn't be blurred more than MC, caused
by the distance between the 'objects', in relation to the camera.
In case the background would be to much blurred in relation to Larissa,
it would look like if they where floating in front of a random background instead
of being integrated within the scene.
So I create an additional mask as a gradiant for the background, which allows me
to have the left side of the background even more blurred than the side behind Larissa.
This supports again the feeling of distance from camera perspective.
MC, on the other hand, is much more blurred, to support the feeling,
having him really close to the camera.

Adjusting the default colorgrading a bit with a curve node, for the character image,
to make sure it fits and getting a bit more saturation through this, I also throw in
the denoiser to clean up the noise.
The next step is to adjust/support the lighting and FX-ing the background
behind Larissa to let her pop out even more in order of contrast.
I know that there is a cloth rack, hidden by MC's head, so I'll fake some
additional ambient occlusion coming from this rack, to support the depth
of the images and get the lighting under control, coming from the window,
which is the main lightsource in the Entrance area at daytime.
I couldn't over do it, because if the background would be to dark, the
values would kill MC's head in the foreground.
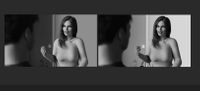
I didn't like the result, so I invert the process.
I'll create the additional darkness with adding additional light and
lower the values of the characters.
LEFT -- MC's head blurred into the background to much, flat values, no depth at all
RIGHT -- Good contrast for MC, picture depth is clean, Larissa pops from background too
To support the direct lighting coming from the window, I add some
gradient glow to Larissa's Leftside, which also support the feeling that
she is slightly turned sideways 'away' from the window.
And the same effect also decent on MC's Neck.
It's actual a bit over the top, but this will be adjusted in a few moments
Adding in an additional hotspot to support the ambient occlusion and give
Larissa's headarea more focus.
To push this effect even more I add a light darker gradient on the
right side of the image.
This is also a slightly added 'shadow effect' to integrate the characters,
or Larissa in this case, even more and give it more depth, in case of distancing!
Now there is the feeling of something is infront of the door and blocks incoming light.
At the end, I add some decent glare for the full image to get this
smooth-milky look to fit the style of the game.
Throw in an additional RGB curve and decrease the saturation
Re-adjusting some values from before to clean up.
Get some lens distortion in, and it's done.